First we have to fix the materials for both the skin and the hair.
For the skin, check my post Fixing Skin in Vue imported from DAZ
**Remember that some of DAZ's hairs are different from others, The hair used here was the Hampton. You might need to change the Highlight and bump settings depending on your scene or the Hair Object that you use.
Fixing the Materials for the Hair
- Lower the bump to 0.01
- In [Highlights] tab: Put [Highlight global intensity] and [Highlight global size] to 100%
- Make sure you have [Variable Highlight] checked.
- Right click on [Highlight production] and go to Edit Function. Link Highlight to your Texture map and set it to gray-scale.
Once the material is fixed, there are still some issues that need to be checked on render quality, for example rendering with the presets sometimes brings unexpected results (like transparencies showing weird shadows)
Fixing the Render Settings
How I set up my Render settings in [User Settings] is:
- Advanced effects quality: 50%
In the [Anti-Aliasing] have both Object and texture checked and then click on the Edit button
- I find that [object anti-aliasing] for the hair works best in [Systematic]
- [Subrays per Pixel] Min 6, Max 16
- [Quality Threshold] Contrast 50% and Geometry 0%
Render testings
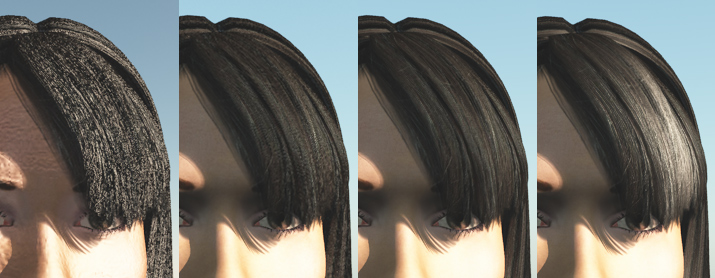 |
| How the quality of the image changes with the use of materials changes and render settings. |
- The first Image is how it rendered [Final] just after import.
- Second is after all materials have fixed the bump.
- Third image is after fixing the render settings in [User Settings].
- Fourth is after adding the correct highlights to my hair.
This should already give you pretty good results, but there is still one more thing.
For realism its best to use [Global Radiosity] in your [Atmosphere Editor] [Light ] Of course its not necesary and it depends on what your scene needs, but here are some before and afters:
 |
| Your Atmosphere will change drastically how your model looks. |